Basic Usage
After installing via one of the means mentioned on the installation page, the program works like this.
Adding Transactions
When you want to add transactions, you can run something as simple as:
rcheckbook add --vendor Bill -m "pay back loan" -a -50
That would register a withdrawal of $50 that took place today.
If you want to give your new transaction a category as you add it, you would run something like this:
rcheckbook --vendor "Fake Street Electronics" --category Gifts -m "Head set" -a -200
As you can see, the provided examples all record the present day, but what if you what to record something that has happened or will happen?
That can be done as easily by typing something as simple as this:
rcheckbook add -d 2026-01-05 --vendor "Velociraptor Entertainment" -m "Pay Day" -a 500.50
This will record that you got paid by Velociraptor Entertainment on Jan. 5, 2026.
If you want to see what else you can provide at the time you try to add a transaction, run:
rcheckbook add --help
This will get you the whole list of options.
However, the two options that should always be provided are the vendor and the amount.
Viewing Ledger
After adding some transactions, you would no doubt like to see your transactions.
This is where rcheckbook blows Bryce's original program right out of the water.
If you want to see everything, you would run the following:
rcheckbook list
This will produce output that looks like this:
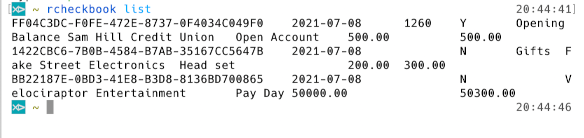
The results you actually see may be different, depending on the window size of your terminal emulator, but the arrangement is the same.
Now, those of you who are familiar with Bryce's original program might be wondering why this supposedly blows that out of the water, and you would be right that this example is not mind blowing.
After all, it is the same data you get by just launching the original app, except for the identifiers.
However, the part that blows it out of the water is the filtering.
Let's say that you want to list transactions where you bought or sold head set. As long as you noted that down as a memo, you could run the following:
rcheckbook list -m "Head set"
This will display any transactions involving head sets, regardless of the casing found.
What if you wanted to find any unreconciled withdrawals? That would be as simple as run:
rcheckbook list --not-reconciled -t withdrawal
You can also apply the vendor and category filters like this:
rcheckbook list --vendor Amazon --category Gifts
However, you can mix and match pretty much any option, giving you much more powerful filtering than what Bryce's original app gave.
If you want to see what else you can filter by, run the following:
rcheckbook list --help
Getting Summaries
Being able to look at the ledger itself is fine and dandy, but what if you wanted to take a quick glance at things?
Luckily, this too is possible.
To get this data, you would run:
rcheckbook summary
This will produce output like the below.
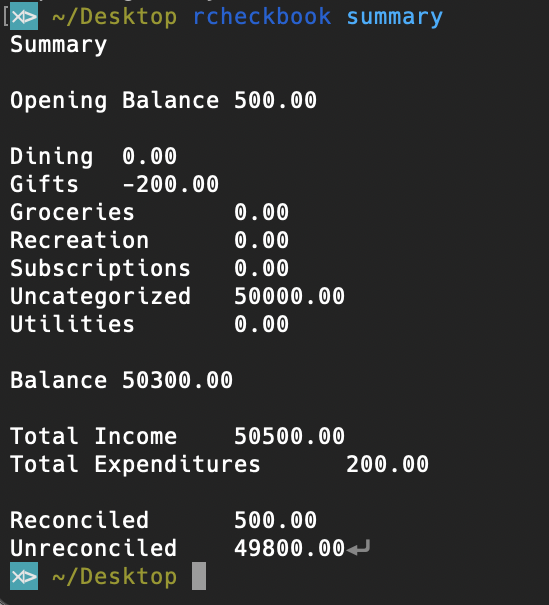
As you use this program and add categories of your own, this summary will get longer than what you see here.
However, a big problem arises when you want minute details because these summaries will add up both expenditures and income.
To get around this, you can create dedicated categories, but adding stuff to existing categories will be harder.
This view is taking into account all transactions that took place.
If you would like to decrease the window of time, you can filter it like this:
rcheckbook summary -p half-year
This will summary everything from 6 months ago to now.
Other options include:
- week
- month
- quarter
- year
- all (default)
Now is always the end point for each time period, except for the default.
Updating Transactions
Let's say that you made some sort of mistake or you want to balance your checbook.
That can be done easily as well.
For example, if a friend paid you money, but you mistakenly recorded it as you paying him, you could correct it like this:
rcheckbook update -i FF04C3DC-F0FE-472E-8737-0F4034C049F0 -t deposit
Now, you guys might be wondering why there is a t there, when it was not necessary when adding a transaction.
This is because there is a possible instance in which you got the amount correct, but accidentally inputted with the wrong sign.
In these instances, you would just move the amount over, and being able to just change the transaction type is quicker than cutting/copying and pasting.
What about if you accidentally marked a transaction as reconciled?
This too can be easily remedied by typing something like this:
rcheckbook update -i FF04C3DC-F0FE-472E-8737-0F4034C049F0 --not-reconciled
As you can see, each time you run an update, you need to provide an id. This is how you target transactions.
Like when adding, there are many other things that you can do, and you can discover what you can change by running:
rcheckbook update --help
Deleting Transactions
What if you accidentally added something you didn't mean to, or it actually never happened?
In these cases, it makes sense to delete a transaction, and this is the simplest out. there.
In order to delete a transaction, you would simply run something like this:
rcheckbook remove -i FF04C3DC-F0FE-472E-8737-0F4034C049F0
This will remove the transaction with a given identifier, and is the only way to delete a transaction, not counting deleting the database and importing a back up with the data deleted.
Selecting A Database
So far, all the examples provided have not specified a database location directly.
This is so that things can be kept simple, but if you want to keep track of other spending or break things up, you can specify the database location and name like this:
rcheckbook list /home/bob/checking.db
This has existed for quite a while because Bryce wanted to be able to use this program to interact with the database generated by his original program, since some UI stuff started acting up.
If you do not include a path like this in any of the above commands, the program will look in a folder called .checkbook, located in the user's home directory, for a databased called register.db